Getting Started with Microsoft Entra ID
Step‑by‑Step Guide: Entra ID, Tenant, User Creation, Groups, and Custom Domains
Identity is the backbone of cloud adoption. Once you’ve signed up for Azure, the next step is to configure Microsoft Entra ID (formerly Azure Active Directory). This service manages authentication, authorization, and directory services across your cloud environment.
By attaching a custom domain and creating users under it, you ensure professional, secure, and scalable identity management. Adding users to groups further simplifies access control and governance.
If you’d like to watch a step‑by‑step walkthrough of Introduction to Cloud Computing, Azure Plans and Sign-up, Promote a DC, Windows 11 installation, or Domain join, please visit our post-
If you’d like to watch a step‑by‑step walkthrough of these steps, please visit our YouTube Video.
1. What is Microsoft Entra ID
Microsoft Entra ID is Azure’s identity and access management service. It provides:
Authentication: Verifies user identities when they sign in.
Authorization: Grants or denies access to resources based on roles and policies.
Directory Services: Acts as a cloud-based directory for users, groups, and devices.
Single Sign‑On (SSO): Users log in once and access multiple apps seamlessly.
Security Features: Multi‑Factor Authentication (MFA), Conditional Access, Identity Protection.
Why it’s important:
Every Azure resource is tied to Entra ID for access control.
It enables secure collaboration across teams, partners, and customers.
It’s the foundation for compliance, governance, and enterprise scalability.
2. Tenant and Tenant ID
When you create an Azure account, you automatically get an Entra ID tenant.
- Tenant: A dedicated, isolated instance of Microsoft Entra ID that represents your organization. It contains users, groups, applications, and policies. Think of it as your company’s identity boundary in Azure.
- Tenant ID: A globally unique identifier (GUID) assigned to your tenant. Example:
a1b2c3d4-5678-90ab-cdef-1234567890ab.
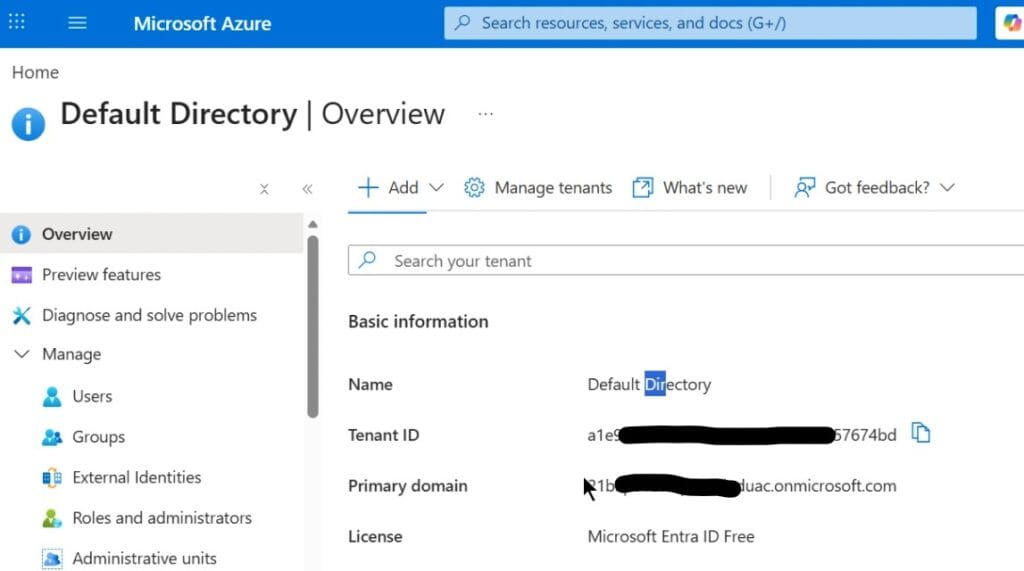
Where to find Tenant ID:
- Go to Azure Portal → Microsoft Entra ID → Overview.
- Under Tenant Information, you’ll see:
- Name (e.g., Default Directory or Name).
- Tenant ID (GUID).
- Primary Domain (
yourtenant.onmicrosoft.comor custom domain).
Why Tenant ID matters:
- Required when configuring APIs, SDKs, or automation scripts.
- Used in PowerShell and CLI commands (
az account show). - Needed for integrating third‑party apps with your directory.
3. Custom Domains in Entra ID
yourtenant.onmicrosoft.com. While functional, it’s not professional for production use.Custom domains (e.g., hktechhub.in) are required when:- You want users to log in with corporate emails (
[email protected]). - You plan to integrate Microsoft 365 services (Exchange, Teams, SharePoint).
- You need branding consistency across apps and portals.
- You want to enable federation with on‑premises Active Directory.
- You want users to log in with corporate emails (
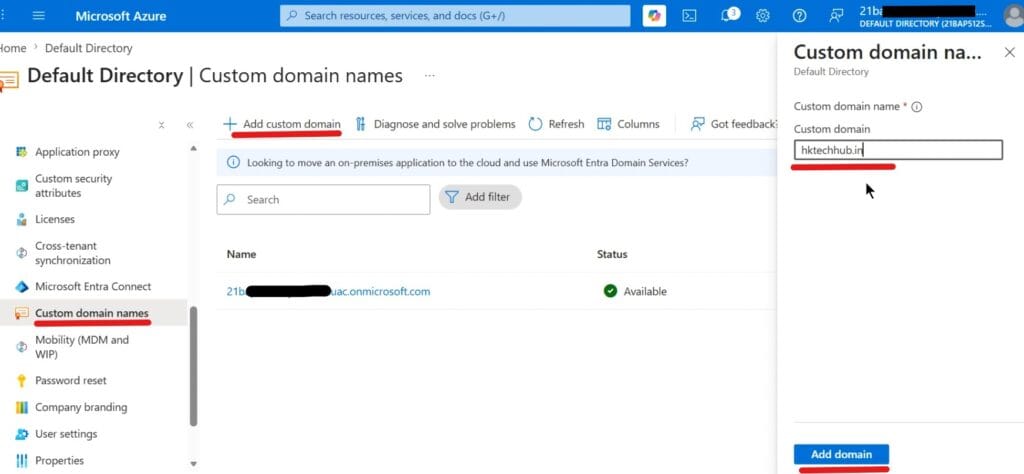
Steps to Add a Custom Domain:
- Go to Azure Portal → Microsoft Entra ID → Custom Domain Names.
- Click + Add Custom Domain.
- Enter your domain name (e.g.,
hktechhub.in) and Click Add domain.
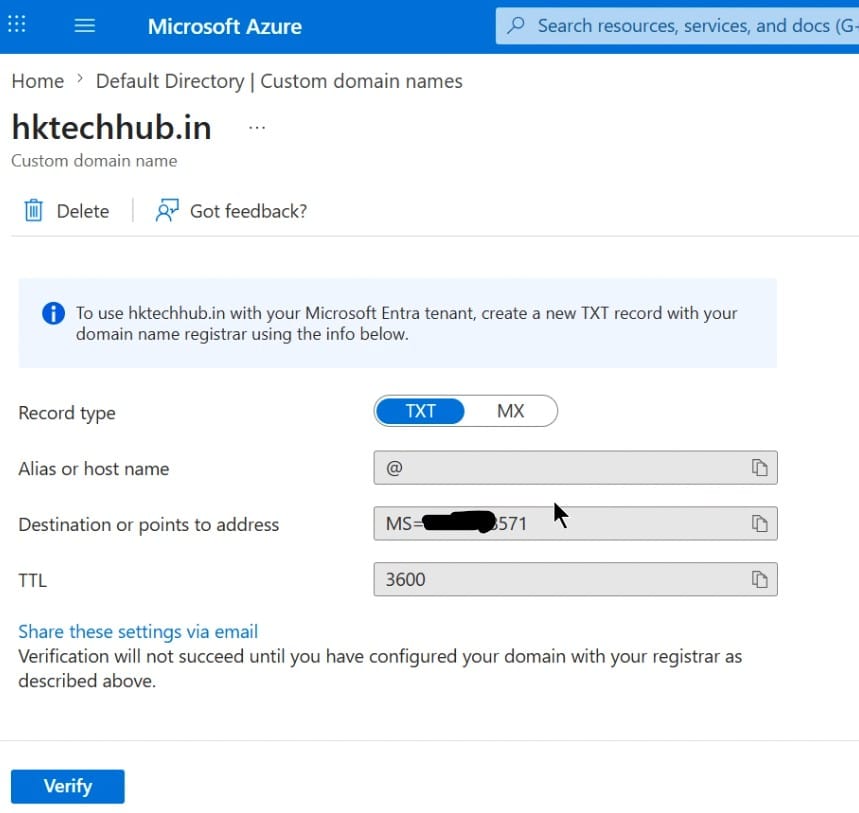
- Copy the TXT record provided by Azure.

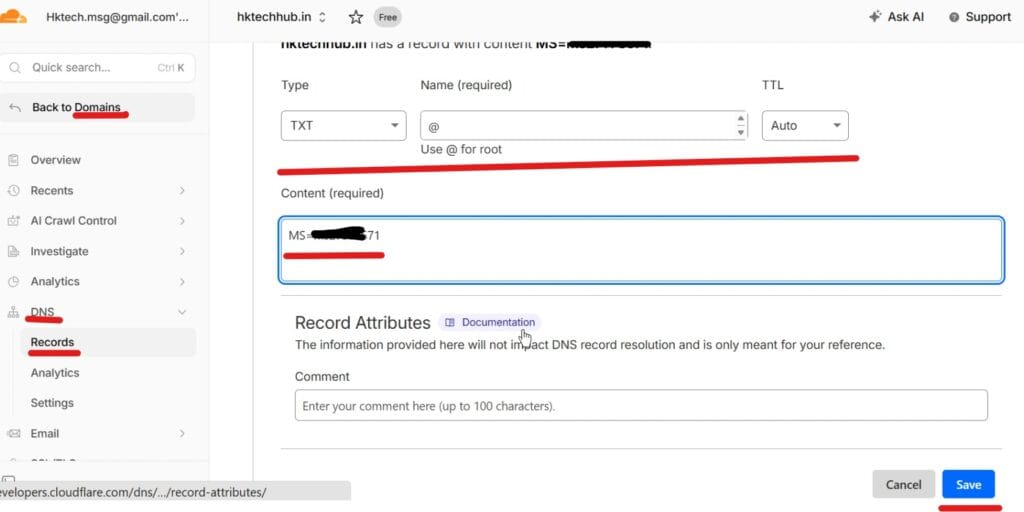
- Add the TXT record in your domain registrar’s DNS settings (Hostinger, GoDaddy, etc.).

- Wait for DNS propagation (5–30 minutes).
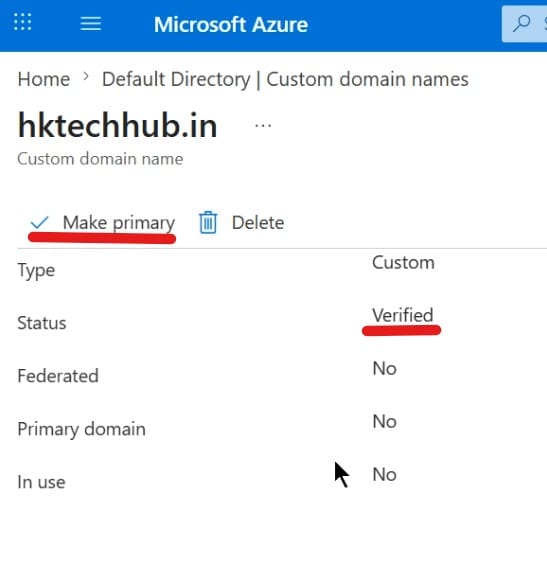
- Click Verify in Azure Portal.
- Once verified, set the custom domain as Primary.

4. Create a User with Custom Domain
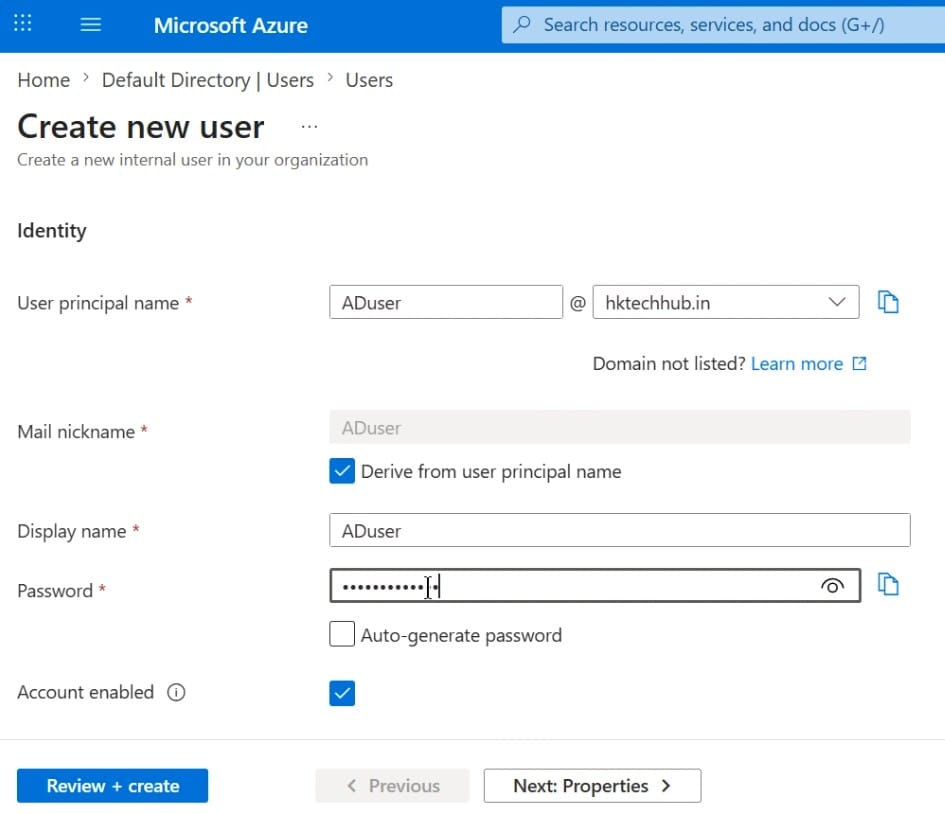
Steps:
- Navigate to Azure Portal → Microsoft Entra ID → Users → + New User.
- Fill in details:
- Name: Full name of the user.
- User Principal Name (UPN):
[email protected]. - Password: Auto‑generated or custom.

- Click Next and Fill in additional properties.
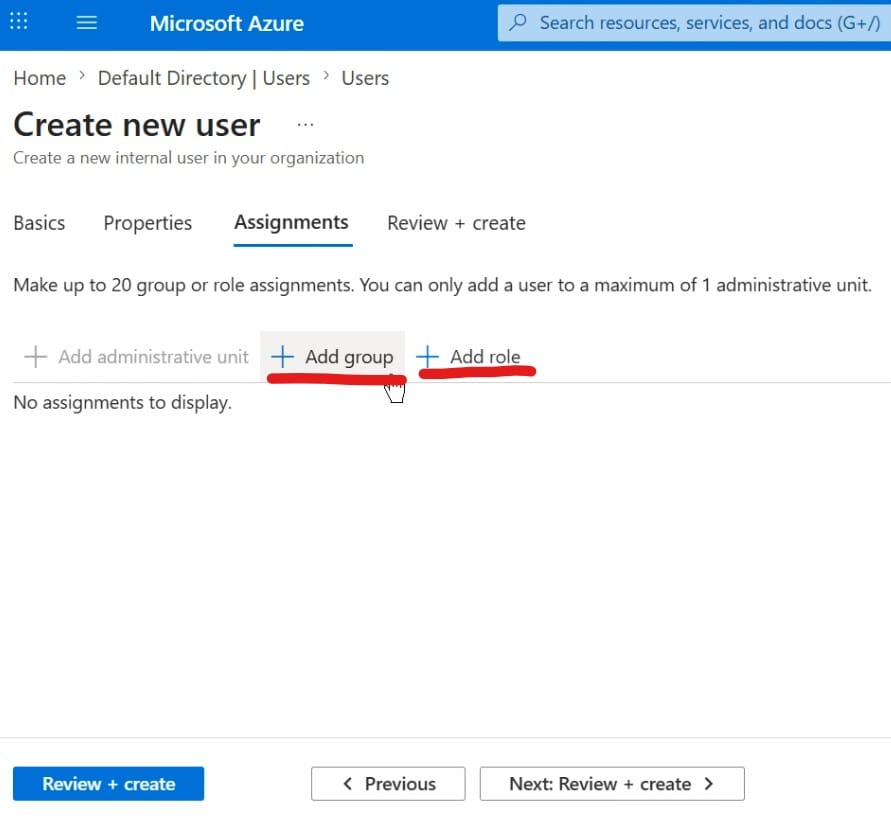
- Click Next and Add Groups or Roles (User, Global Admin, etc.) if needed.

- Review and create the user account.
- User can now log in via
https://portal.azure.com.
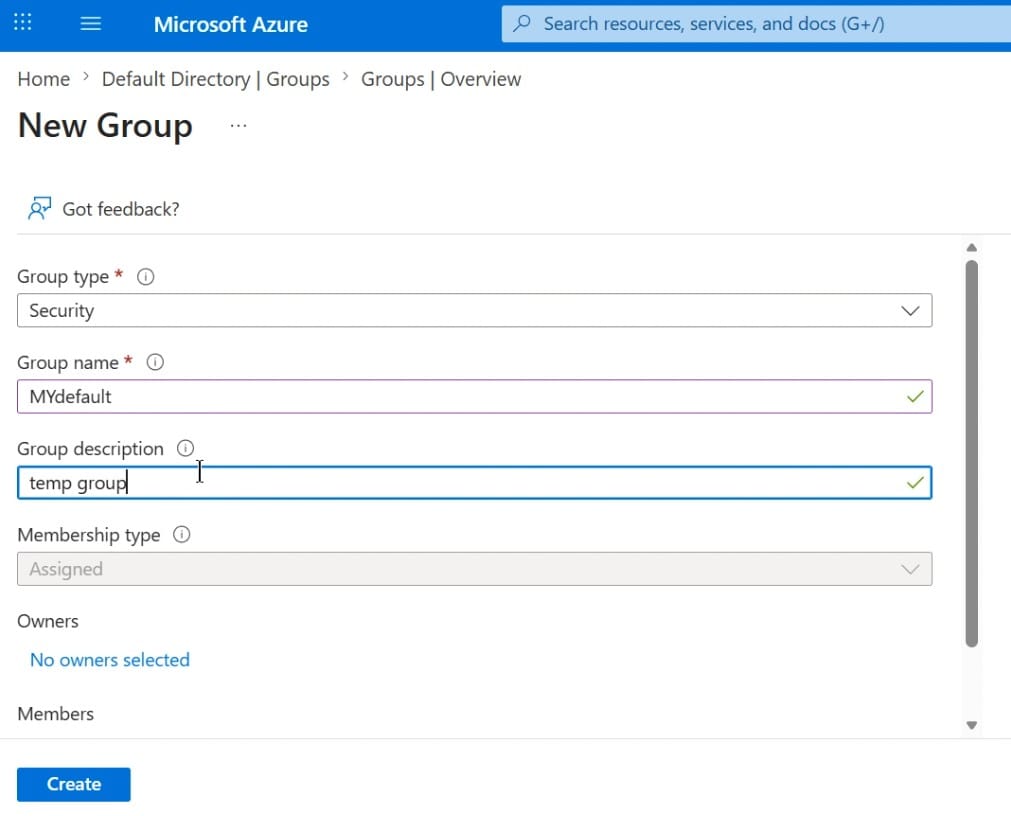
5. Create a Group and Add Users
Steps:
- Go to Azure Portal → Microsoft Entra ID → Groups → + New Group.
- Choose Security Group (for resource access) or Microsoft 365 Group (for collaboration).
- Enter:
- Group Name: e.g.,
IT-Admins. - Group Type: Security.
- Membership Type: Assigned (manual) or Dynamic (rules-based).

- Group Name: e.g.,
- Click on Create.
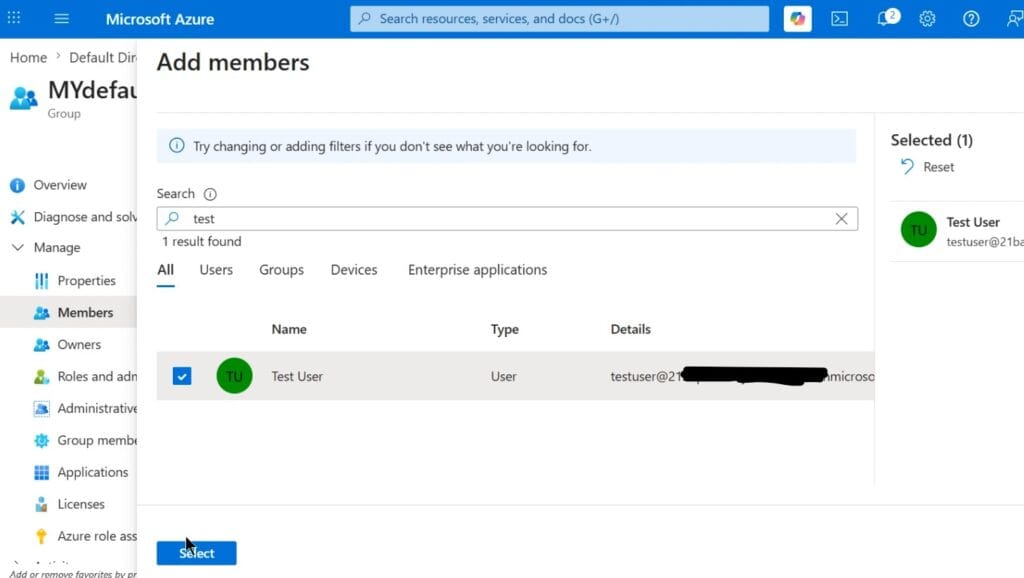
- Open the Group → Members → + Add Members.
- Select the user you created (
[email protected]).
- Click on Select to save the changes.
6. Configure Security Settings
Basic Security Features:
Enable MFA for all users.
Configure Conditional Access Policies (e.g., block sign‑ins from risky locations or IPs).
Set up Self‑Service Password Reset (SSPR) to enable self password reset for user.
Audit sign‑ins via Azure AD Sign‑in Logs.
7. Best Practices
Always verify domains before assigning users.
Use Groups to manage permissions instead of assigning roles individually.
Apply least privilege access.
Regularly review sign‑in logs and audit reports.
Backup directory settings before major changes.
8. Key Takeaways
Key Points:
Microsoft Entra ID is the foundation of Azure identity and governance.
Tenant and Tenant ID define your organization’s identity boundary and are essential for integrations.
Custom domains make your tenant professional and enable Microsoft 365 integration.
User creation under custom domains ensures scalable identity management.
Groups simplify access control and enforce consistent policies.
Security features like MFA and Conditional Access protect against unauthorized access.
Pro Tip – Always test with a pilot group before rolling out policies organization‑wide. This helps validate login, MFA, and access settings without disrupting production users.