Getting Started with Microsoft Azure

Step‑by‑Step Guide: Free Trial, Student Plan, Startup Plan, and PSYG Plan and Azure Portal Home Page

Cloud adoption begins with exploring the platform hands‑on. Microsoft Azure makes this easy by offering multiple entry points tailored to different audiences — from individuals experimenting with cloud services to students, startups, and enterprises.

In this post, we’ll break down the available plans, their benefits, and how to navigate the Azure Portal landing page. There are four plans to start Azure cloud experiences.

      1. Azure Free Trial
      2. Azure for Students
      3. Azure Startup Plan
      4. Azure PSYG Plan

If you’d like to watch a step‑by‑step walkthrough of Introduction to Cloud Computing, Windows server 2022 installation, Promote a DC, Windows 11 installation, or Domain join, please visit our post-

      1. Introduction to Cloud Computing.
      2. Create a Virtual Machine and Install Windows server 2022
      3. How to Promote a Server to Domain Controller (DC).
      4. How to install Windows 11 with/without TPM.
      5. How to Join a Windows Client to a Domain.


If you’d like to watch a step‑by‑step walkthrough of these steps, please visit our YouTube Video.

1. Microsoft Azure Free Trial

Azure provides a Free Trial for new users to explore cloud services risk‑free.

Key Features:

      • $200 free credits valid for 30 days.
      • 12 months of free access to popular services (VMs-specific SKU, databases, storage).
      • Always‑free services like Azure Functions, DevTest Labs, and more.

Steps to Get Started:

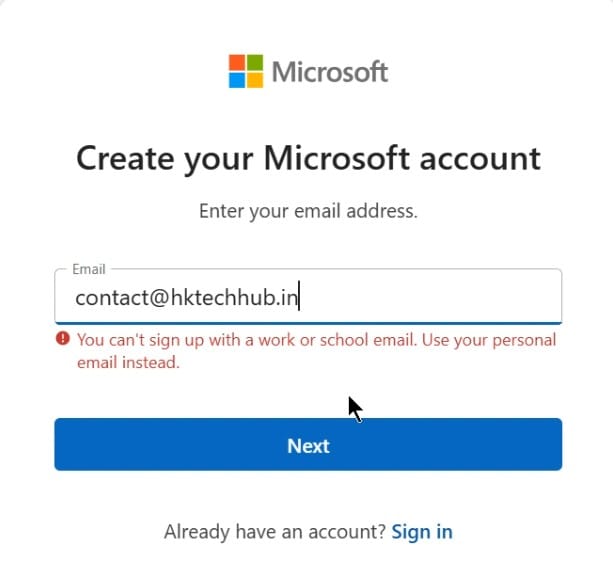
    1. Create Microsoft Account – Go to the Azure Free Trial page and sign up using your personal email address to create a Microsoft account. Microsoft Azure - personal email
    2. Verify Identity – Enter the code sent to your email address and confirm.
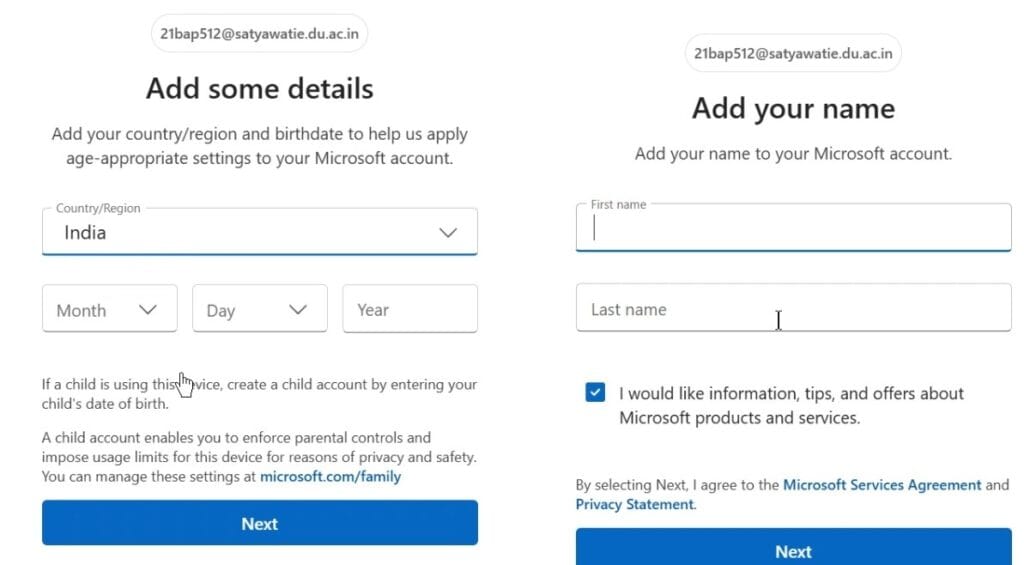
    3. Enter Personal Details – Fill in your country/region, Date of Birth, Name, and phone number for verification.
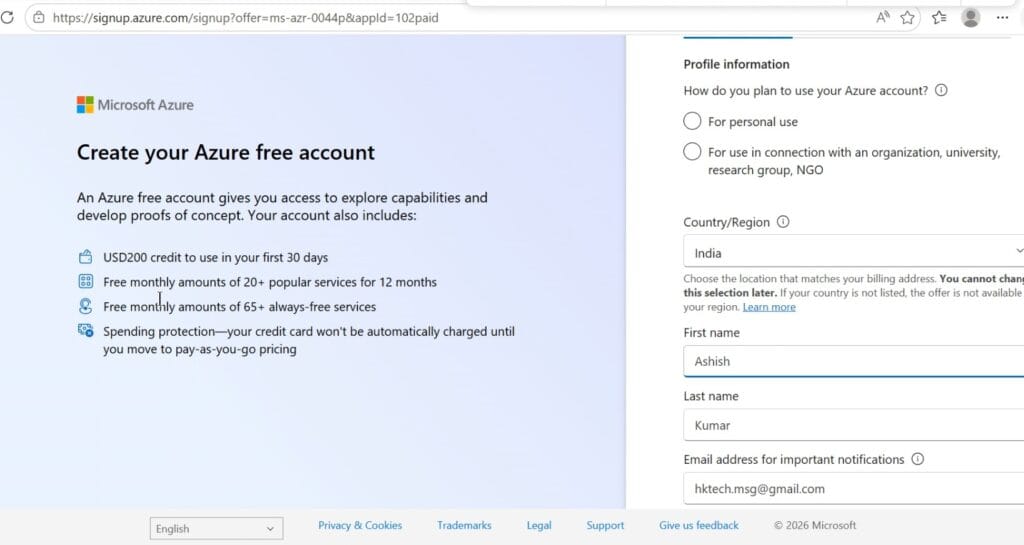
    4. Profile Information – Fill in Prompted details on Azure Free account Page like choose For personal use, Region, Name, Email ID, Phone number, Company Name then click Next. Microsoft Azure - Azure Profile
    5. Address Information – Fill in your address details then Next. Microsoft Azure - Address
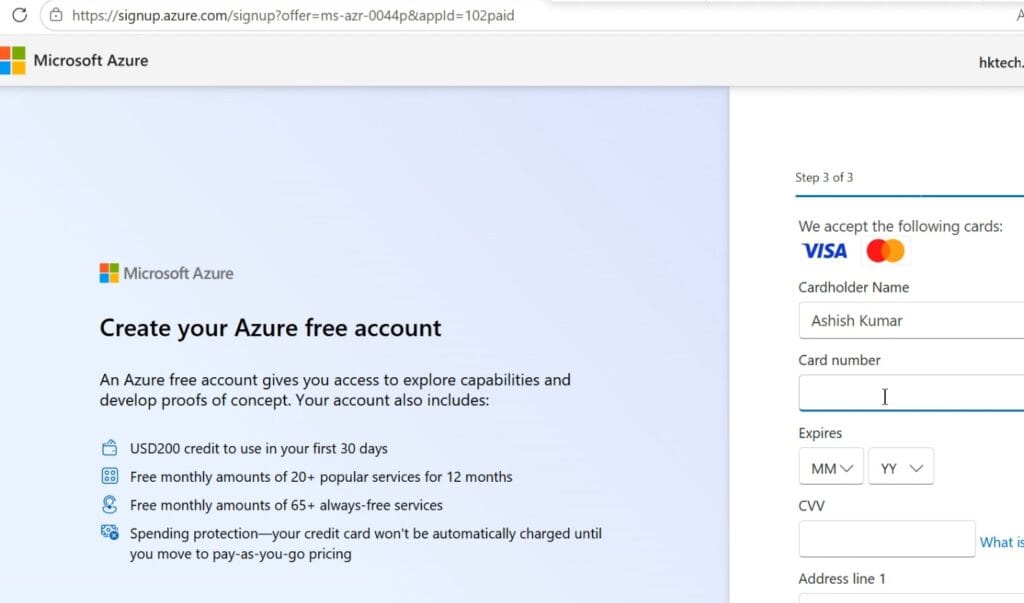
    6. Payment Information – Provide a valid credit or debit card details for identity verification, it will deduct only 1 or 2 INR for verification— you won’t be charged unless you upgrade then click Sign-up. Microsoft Azure - Payment
    7. Accept Terms – Review and accept Microsoft’s subscription agreement and privacy statement.
    8. Access Azure Portal – Once verified, you’ll be redirected to the Azure Portal with $200 credits and free services.
    9. Track credit usage in Cost Management + Billing to avoid exceeding credits.

2. Microsoft Azure for Students

Designed for learners, this plan removes the need for a credit/debit card.

Key Features:

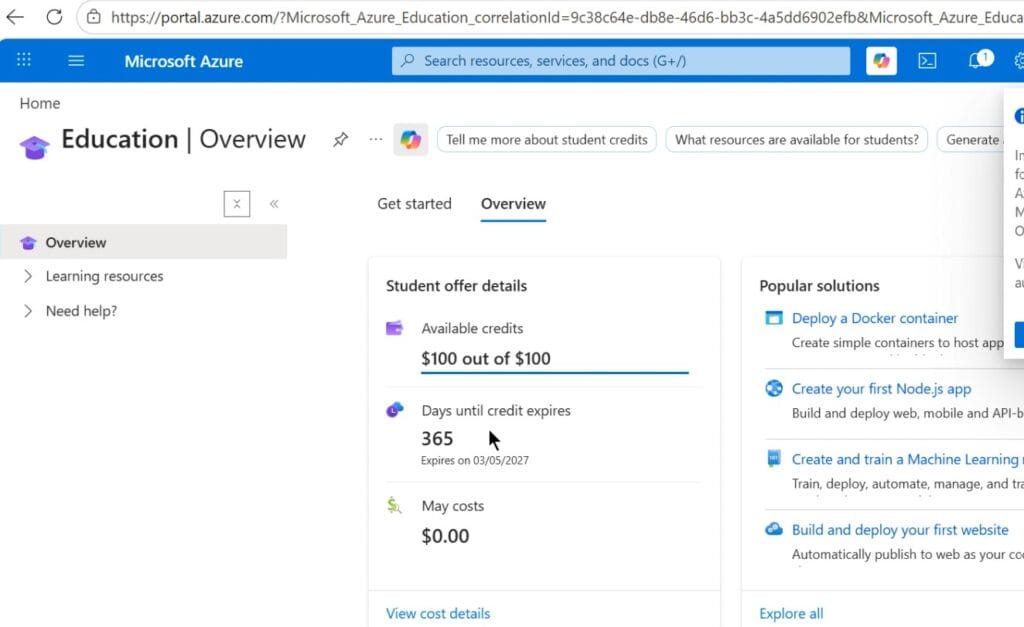
      • $100 free credits valid for 12 months.
      • Free access to developer tools like Visual Studio Code, GitHub Student Pack, and Azure Dev Tools for Teaching.
      • Ideal for experimenting with VMs, databases, and app services.

Steps to Get Started:

    1. Visit Azure Students Page – Go to the Azure for Students signup page to begin the registration process and click on Start Free.
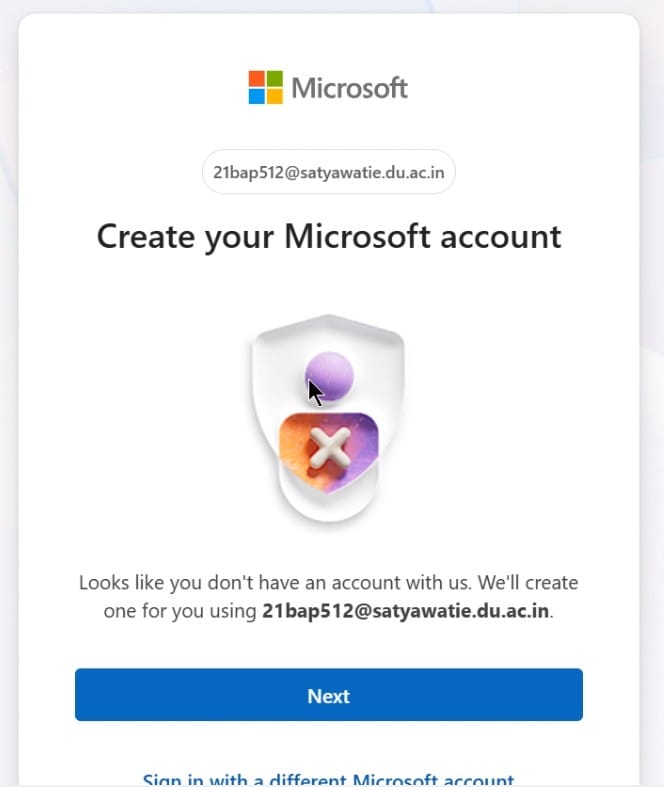
    2. Sign In or Create Account – Use your academic/college/university email to sign in or create a new Microsoft account. Microsoft Azure - create
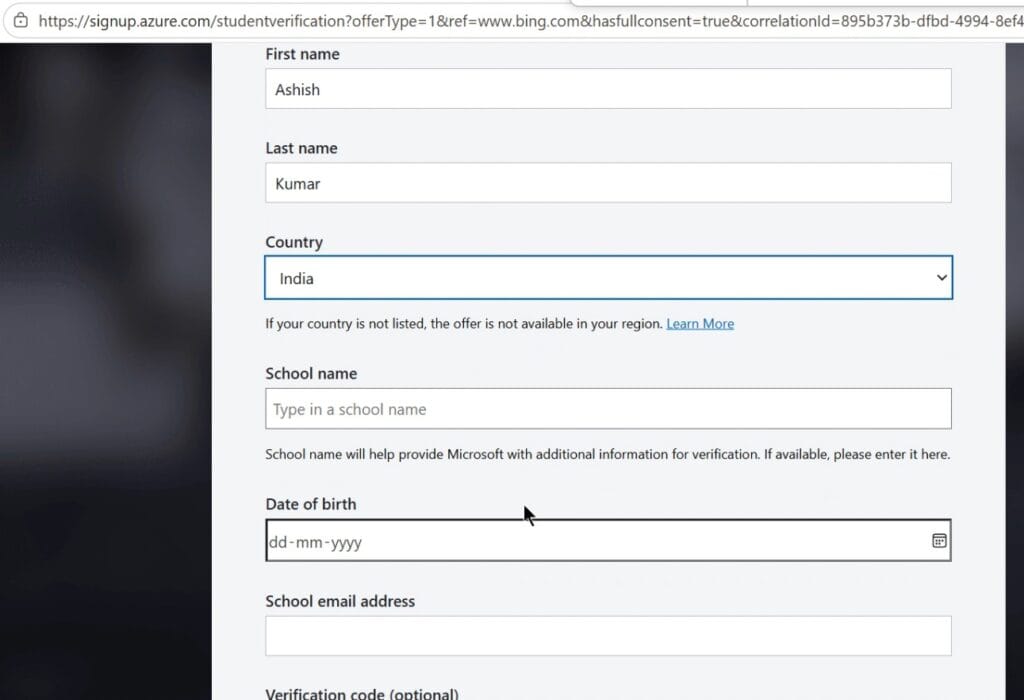
    3. Fill your Region, Date of Birth, Name, Address, College Name, Address when prompted on form. Microsoft Azure - Name DOB Microsoft Azure - Details
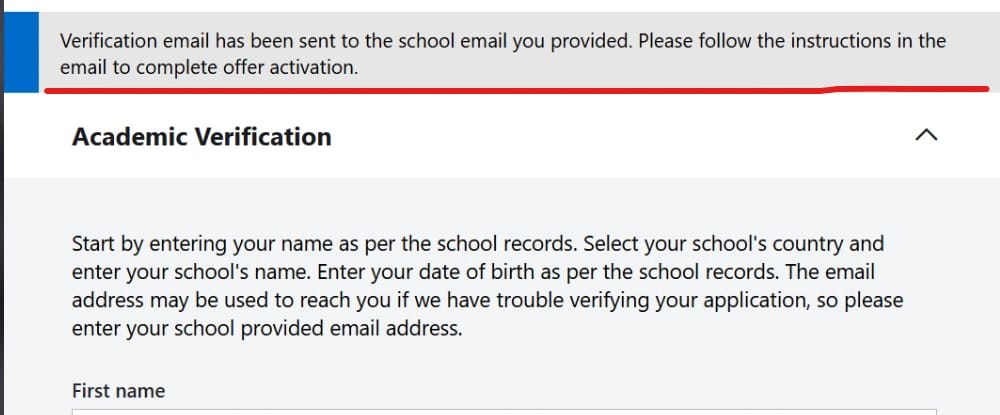
    4. Verify Student Status – You will receive an email with Verification link from Microsoft for Confirm eligibility by verifying your school or university email domain. Microsoft Azure - Verification
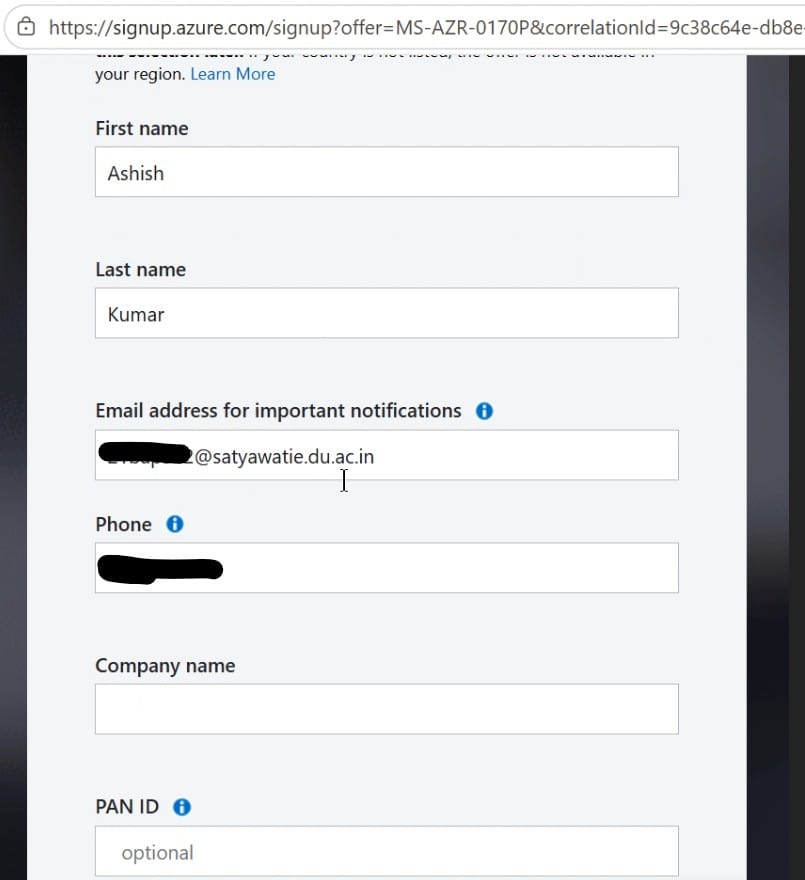
    5. Enter Basic Details – Provide your name, country/region, company name and phone number for Azure account setup. Microsoft Azure - Post details
    6. No Credit Card Needed – Unlike the free trial, students don’t need to provide payment details.
    7. Accept Terms – Agree to Microsoft’s subscription agreement and privacy statement.
    8. Access Azure Portal – You’ll receive $100 credits for 12 months and free developer tools to start experimenting with cloud services. Microsoft Azure - Credit
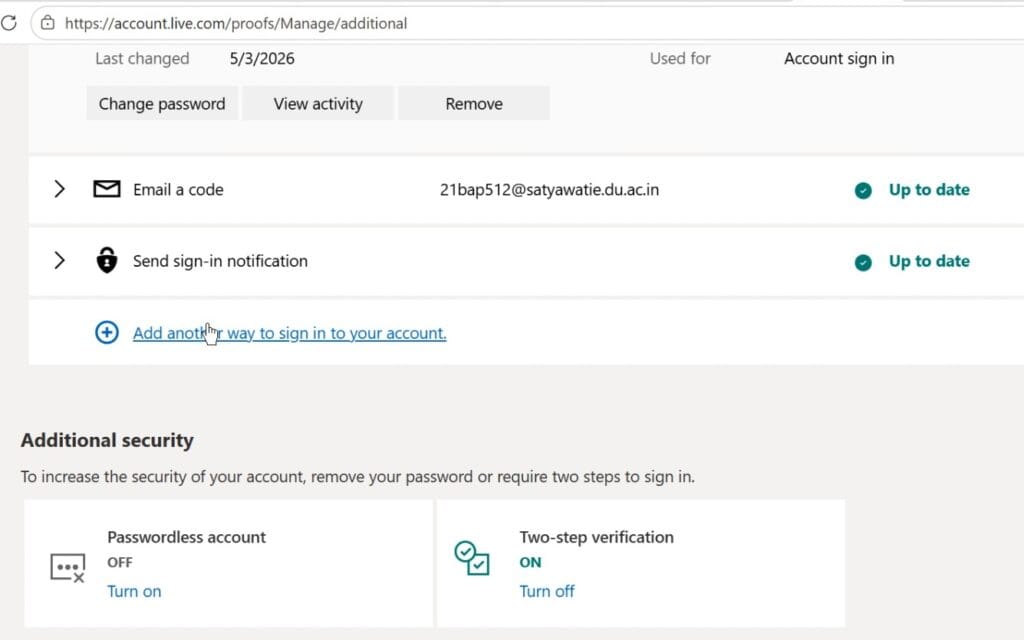
    9. Go to Manage my account page to update the sign in method like password/password-less login, Multifactor authentication setup or 2-factor authentication. Microsoft Azure - Signin Method

3. Microsoft Azure Startup Plan

For entrepreneurs and early‑stage companies, Azure offers startup credits and support.

Microsoft for Startups is a program that helps founders overcome common startup challenges by providing access to AI services, expert guidance, and essential technology. The program offers benefits like free Azure credits, AI tools, and resources to help you build, scale, and sell your solutions.

Key Features:

      • Up to $150,000 in free Azure credits (depending on program tier).

      • Access to technical support, mentorship, and co‑selling opportunities.

      • Integration with Microsoft’s partner ecosystem.

Steps to Get Started:

    1. Apply through the Microsoft for Startups program.

    2. Provide company details and validate eligibility.

    3. Receive credits and resources to scale apps or SaaS products.

    4. Leverage Azure Marketplace for distribution.

4. Microsoft Azure PSYG Plan

The Pay‑As‑You‑Go (PSYG) plan is the standard model for individuals and businesses. It is best for customers ready to start building production workloads.

Key Features:

      • Free monthly amounts of 20+ popular services for 12 months (new Azure customers only).
      • No upfront cost — pay only for what you use.

      • Flexible scaling across services.

      • Ideal for production workloads and long‑term projects.

      • Access to full catalog of services with no cap on service usage.
      • Technical support options available.
      • No upfront commitment—cancel anytime.

Steps to Get Started:

    1. Sign up for the Azure PSYG plan.

    2. Add payment details for billing.

    3. Create subscriptions and resource groups.

    4. Monitor usage with Azure Cost Management.

5. Microsoft Azure Portal Landing Page

Once signed up, you’ll access the Azure Portal — the central dashboard for managing resources.

Landing Page Overview:

      • Home Dashboard: Quick access to Microsoft Entra ID, resource groups, subscriptions, and services.
      • Search Bar: Find any service instantly (VMs, databases, networking).
      • Navigation Menu: Access Compute, Networking, Storage, Databases, AI + ML, and Security.
      • Cost Management: Monitor credits, spending, and budgets.
      • Marketplace: Explore pre‑built solutions and partner apps.
      • Help + Support: Access documentation, tutorials, and community forums.
      • Manage My Account: Quick access to manage your account portal for account management and security features.
      • Cloud Shell: To run the Bash or powershell Commands.
      • Notification Bell: To get the instant notification for deployment or configuration changes. Microsoft Azure - Azure Portal

6. Key Takeaways

Key Points:

      • Start with the Free Trial or Student Plan to experiment safely.

      • Entrepreneurs can leverage the Startup Plan for scaling.

      • The PSYG Plan is best for long‑term, production workloads.

      • The Azure Portal is your command center — learn its layout early to save time.

    • In the next post, we’ll cover Microsoft Entra ID/Directory, Custom Domain, and creating a User with custom domain — the foundation of Azure cloud operations.

Pro Tip Before diving into Azure, sign up for free credits and explore the Azure Portal. Start small — create a resource group, deploy a VM, and experiment with networking. Taking snapshots or backups before changes will save you from costly mistakes.

Discover more:

Head over to our Blog page for the latest posts.

Share Your Thoughts

Your email address will not be published. Required fields are marked *

Scroll to Top